Setting Up and Containerizing Pihole, Unbound, and Wireguard
I recently started running pihole, unbound, and wireguard together on my home network. I wanted each service to run in a separate container, but that presented some issues with network interactions between the services. This post is a guide to show how I set it up.
Background of these services
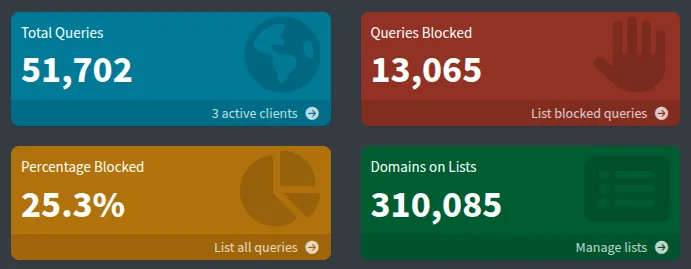
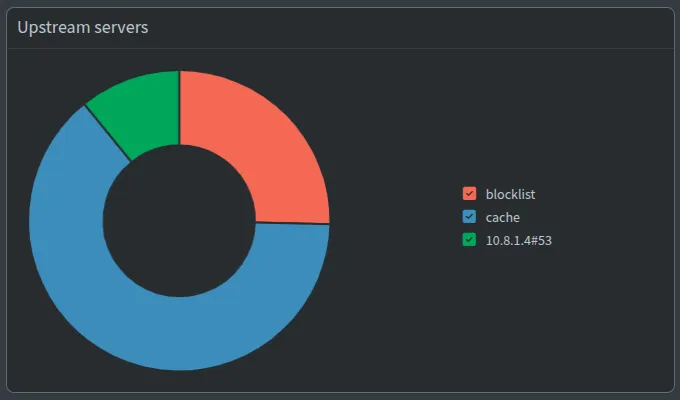
Pihole is an ad-blocking service that was built specifically to run on the Raspberry Pi. It acts as a DNS server that forwards requests to an upstream DNS resolver. If it recognizes a domain as an ad domain, it will block the request before forwarding it. It also maintains a cache of DNS requests that it can return without forwarding. I’m always surprised how few requests actually make it to the resolver (10.8.1.4):
Unbound is the second piece of the puzzle. Normally, clients requests a third-party DNS service like Cloudflare or Google to resolve DNS requests. The owners of the DNS servers you request have the ability to associate you with every site you connect to and store that data indefinitely. This doesn’t mean they do store that data, but they may and you need to trust whatever their policy says. Unbound resolves these DNS requests locally and requests the authoritative nameservers directly, cutting out the need for a middleman.
Finally, wireguard is a VPN. I put all my personal devices and the pi on it so I can access these services even when I’m not on my home LAN, without exposing public ports on my router.
This guide will break down setting up each service into its own step. This is a different order than I took when I set this up, but is more logical for wanting all three of these services at the same time from scratch.
Prerequisites
While not impossible, it will be pretty difficult to set this up without admin access to your router / the ability to reserve an IP address for a device, and this guide will assume you have both of these abilities. Navigate to your router’s admin page and reserve a static IP address for your pi. Static IP reservation is a differrun ent process depending on the router you have, so I can’t tell you exactly how to do that.
If your ISP changes your public IP every couple days (like most do), you will need a way for your devices to stay up-to-date with what that public IP is. The easiest way is to buy a domain which resolves to your public IP, then update that DNS record whenever your IP changes. You can use Cloudflare to manage the domain, and run something like ddclient on the host to check for public IP changes.
Step 1: Unbound
The image I used here is mvance/unbound-rpi. Put this in your docker-compose.yml:
unbound: <<: *restart-policy # in my larger docker-compose file, this just expands to restart: unless-stopped image: mvance/unbound-rpi container_name: unbound volumes: - /dev/urandom:/opt/unbound/etc/unbound/dev/urandom - /dev/random:/opt/unbound/etc/unbound/dev/random - /home/dubs/unbound/forward-records.conf:/opt/unbound/etc/unbound/forward-records.conf # this mount is optional; see below networks: wg: ipv4_address: 10.8.1.4At some point, you’ll also need to set up a network for pihole, unbound, and wireguard to talk to each other on. It’s worth doing this now- append this to your docker-compose.yml:
networks: wg: ipam: config: - subnet: 10.8.1.0/24By default, this image forwards requests to Cloudflare. If you don’t like that, you can configure it to resolve everything locally by blanking out forward-records.conf:
mkdir unboundtouch unbound/forward-records.confTo test that unbound is correctly working, you can run this command, which spins up an alpine container on the wg network and attempts to resolve a DNS request through unbound:
docker run --rm --network dubs_wg alpine sh -c "apk add bind-tools && dig +short @10.8.1.4 example.com"You should see the IP addresses that example.com resolves to.
Note that my user here is dubs and your network name will probably be different!
Step 2: Pihole
Pihole has an official Docker image, so I just built from that. Follow from the guide for Docker compose in the repository:
pihole: <<: *restart-policy image: pihole/pihole container_name: pihole ports: # dns ports - "53:53/tcp" - "53:53/udp" # use secondary http/https port since nginx (running on host) gets 80 and 443 - "8080:80/tcp" - "8443:443/tcp" environment: TZ: "America/New_York" FTLCONF_webserver_api_password: "${PIHOLE_ADMIN_PASSWORD}" FTLCONF_dns_listeningMode: "ALL" # FTLCONF_dns_interface: "eth0" volumes: - ./etc-pihole:/etc/pihole cap_add: - SYS_NICE - SYS_TIME networks: wg: ipv4_address: 10.8.1.3Important notes here:
- Pihole has three settings for interfaces it listens on: only local devices, an interface you specify, or all interfaces. I want pihole to serve both devices on my LAN (that aren’t necessarily connected to the VPN) and wireguard devices, so I set
FTLCONF_dns_listeningModetoALL. Update this andFTLCONF_dns_interfaceaccordingly if your setup differs. - This requires you to
mkdir etc-piholefor persisting settings and state - I recommend setting
PIHOLE_ADMIN_PASSWORDas an environment variable (I put mine in~/.bashenv) so you don’t have to reset the password every time you restart the container.
Create the container with docker compose up pihole -d[1], then navigate to the admin dashboard at http://YOUR_PI_IP:8080/admin. Go to Settings > DNS > Expert mode, then disable any checked “Upstream DNS Servers” and add this line to the “Custom DNS servers” text box:
unbound#53This tells pihole to hit port 53 on the unbound container for all DNS requests. Fun fact: Docker will resolve the hostname unbound to its wg IP automatically!
While you’re here, you should set up your blocklists. I use 2:
- https://raw.githubusercontent.com/StevenBlack/hosts/master/hosts
- https://cdn.jsdelivr.net/gh/hagezi/dns-blocklists@latest/adblock/pro.txt Add these in Lists > Add blocklist.
Now, you can test resolving DNS using pihole’s IP:
docker run --rm --network dubs_wg alpine sh -c "apk add bind-tools && dig +short @10.8.1.3 example.com"[1] From what I remember, there may be a setup wizard for pihole; if there is, choosing the defaults should be ok.
Step 3: Wireguard
I used wg-easy as the image for wireguard, because it came with a friendly web UI for managing peers that I liked. Note that if your machine doesn’t support legacy iptables, then building from the Dockerfile in that repo will error on these two lines:
# Use iptables-legacyRUN update-alternatives --install /usr/sbin/iptables iptables /usr/sbin/iptables-legacy 10 --slave /usr/sbin/iptables-restore iptables-restore /usr/sbin/iptables-legacy-restore --slave /usr/sbin/iptables-save iptables-save /usr/sbin/iptables-legacy-saveRUN update-alternatives --install /usr/sbin/ip6tables ip6tables /usr/sbin/ip6tables-legacy 10 --slave /usr/sbin/ip6tables-restore ip6tables-restore /usr/sbin/ip6tables-legacy-restore --slave /usr/sbin/ip6tables-save ip6tables-save /usr/sbin/ip6tables-legacy-saveAs the comments in this issue note, you can just comment these lines out and it should work fine - I just built the image like this and called it wg-easy-fixed. Here’s what I have in my docker-compose.yml:
wg-easy: <<: *restart-policy environment: - INSECURE=true image: wg-easy-fixed container_name: wg-easy volumes: - etc_wireguard:/etc/wireguard - /lib/modules:/lib/modules:ro ports: - "51820:51820/udp" # the actual vpn tunnel - "51821:51821/tcp" # the admin dashboard cap_add: - NET_ADMIN - SYS_MODULE sysctls: - net.ipv4.ip_forward=1 - net.ipv4.conf.all.src_valid_mark=1 networks: wg: ipv4_address: 10.8.1.2To access the VPN from outside the home network, you’ll have to forward port 51820 on your router to port 51820 on your pi.
docker compose up wg-easy -d to start the container [2], then go to the admin dashboard at http:/YOUR_PI_IP:51820. Click Admin Panel > Config, make sure the Host is set to your router’s public IP (or your domain, if you went that route) and set DNS to 10.8.0.3 (the docker IP address of pihole). Then, create new clients and set up the VPN on any devices you want connected. This can vary device to device, but for me:
- On my laptop running Ubuntu, I downloaded the .conf file from the admin UI and copied it to
/etc/wireguard/wg0.conf, then I set up the interface using thewg-quickcommand-line tool. - On my Android phone, I downloaded the Wireguard app from the Google Play Store and scanned the QR code.
Depending on how the OS handles multiple DNS resolvers, you can add a backup DNS server here if you’d like. Personally, I have 1.1.1.1 (Cloudflare) as a backup on my laptop, which it falls back to if pihole takes too long. On my phone, I only go through pihole because I noticed that Android doesn’t prioritize the first server when you give multiple IPs.
If all is well, when the VPN is enabled you should be able to:
- Go on a different network than your home LAN (e.g., if on your laptop, your phone’s hotspot)
- Request a domain and see the request logged in pihole’s dashboard
If you can do that: congratulations! You have successfully set up wireguard, pihole, and unbound.
[2] There might be another setup wizard here as well? The important one is to set the host to your router’s public IP.